

about
download
documentation
FAQ
contact

Disclaimer
You may use this program on your own risk! I am not responsible for any damage.
Installation
- Either you download one of the binaries from this page or
from the sourceforge
project page (click on the sourceforge button on the left of this
page) or you get the source and compile it yourself. You can get the
source from the sourceforge CVS. To compile it, you need to have the QT
library installed. Then type (in the clientQT-directory, where the
earth3d.pro file is)
qmake earth3d.pro
make
to create the "earth3d"-binary. Start it with
./earth3d
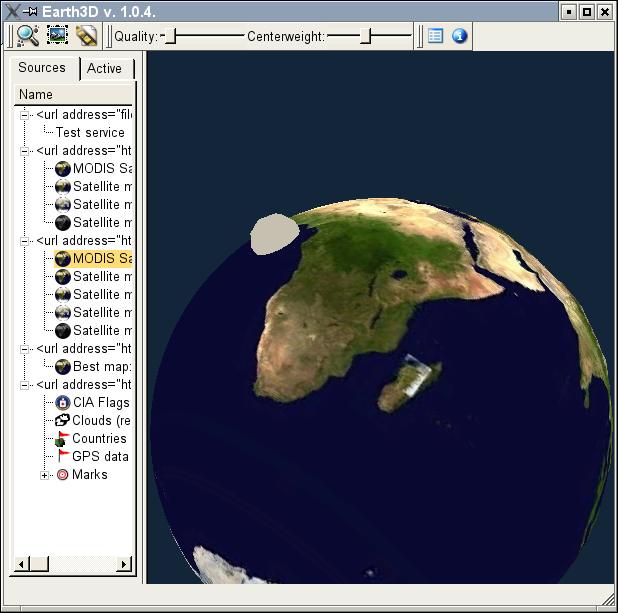
Startup
- after startup, wait some seconds and then open the list on
the left of the screen and load a view of the earth by double clicking
it.
Mouse Navigation
- Click and drag the earth
- Use the mouse wheel to zoom in and out
- Use the middle button to look around
- On the right button you have a context menu
Keyboard Navigation
- To use these keys the focus must be on the 3D view. So you have to left-click once into the 3D area in the right part of the window before you can use these keys.
- A - Forward
- Y, Z - Backward
- S - Stop
- Cursor keys to roll and tilt
- X - turn left
- C - turn right
- PageUp - Up
- PageDown - Down
- F - Toggle fullscreen (but when you toggle back to
non-fullscreen mode, be aware, that most function in the context menu
(right mousebutton on the 3D-Window) will not work correctly)
Development of new visuals
The program can display the following types of visual objects- Maptree (a body mapped with a tree of textures, normally a sphere with a planet texture)
- POI (Point of Interest, points marked with small, clickable icons and a label)
- Scene (a hierarchical XML description of a textured scene containing multiple objects, used e.g. for the cloud layer or the small earth view in the corner of the window)
Adding new objects is simple. You have to create a class that inherits the Draw class (draw/draw.cpp). The Draw class has one method that must be implemented:
| virtual
void draw(Point3D *viewer, bool viewculling, QGLWidget *widget, Point3D
direction, int layer) = 0; |
The draw method is called every time a frame is drawn for every object that is loaded. Now you need to get data into your object. All objects are created in the TreeDrawFactory class (draw/treeDrawFactory.cpp) when parsing a downloaded XML file describing the data of this object. Have a look at draw/treeDrawFactory.cpp and draw/treeDrawPOI.cpp to see how it works. (more documentation will follow).
Example
In this example I will show how to add a new visual that displays a sphere at the coordinates 0N 0E. I will start with a patch file that shows what needs to be changed:
diff -uNr c2/clientQT/draw/treeDrawFactory.cpp c3/clientQT/draw/treeDrawFactory.cpp
--- c2/clientQT/draw/treeDrawFactory.cpp	2004-08-20 17:26:55.000000000 +0200
+++ c3/clientQT/draw/treeDrawFactory.cpp	2005-10-24 21:02:55.938611601 +0200
@@ -10,6 +10,7 @@
 #include "drawScene.h"
 #include "formview.h"
 #include "moveToPositionEvent.h"
+#include "treeDrawTest.h"

 using namespace std;

@@ -192,6 +193,9 @@
     if (type == QString("gpsmark")) {
       newDraw = tagGeometryGpsMark(geometryNode, newDraw);
     }
+    if (type == QString("test")) {
+      newDraw = TreeDrawTest::tagGeometry(geometryNode, newDraw);
+    }

     /* Insert Draw into GraphicsObjectsContainer */
     if (newDraw) {
diff -uNr c2/clientQT/draw/treeDrawTest.cpp c3/clientQT/draw/treeDrawTest.cpp
--- c2/clientQT/draw/treeDrawTest.cpp	1970-01-01 01:00:00.000000000 +0100
+++ c3/clientQT/draw/treeDrawTest.cpp	2005-10-25 06:55:27.936483050 +0200
@@ -0,0 +1,27 @@
+#define GL_GLEXT_PROTOTYPES
+#include "draw/treeDrawTest.h"
+#include
+#include
+#include
+
+TreeDrawTest::TreeDrawTest() {
+  printf("TreeDrawTest new\n");
+}
+
+void TreeDrawTest::draw(Point3D *viewer, bool viewculling, QGLWidget *widget, Point3D direction, int phase) {
+  if (phase!=2) return;
+
+  printf("TreeDrawTest\n");
+  glPushMatrix();
+
+  // put a sphere at 0N, 0E
+  glTranslatef(-1,0,0);
+  glutSolidSphere(0.1, 10, 10);
+
+  glPopMatrix();
+}
+
+Draw *TreeDrawTest::tagGeometry(QDomNode geometryNode, Draw *newDraw) {
+  printf("TreeDrawTest tag\n");
+  return(new TreeDrawTest());
+}
diff -uNr c2/clientQT/draw/treeDrawTest.h c3/clientQT/draw/treeDrawTest.h
--- c2/clientQT/draw/treeDrawTest.h	1970-01-01 01:00:00.000000000 +0100
+++ c3/clientQT/draw/treeDrawTest.h	2005-10-24 21:02:23.360348103 +0200
@@ -0,0 +1,18 @@
+#ifndef TREEDRAWTEST_H
+#define TREEDRAWTEST_H
+#include "treeDraw.h"
+#include
+#include
+#include
+#include "imageList.h"
+
+class TreeDrawTest : public Draw {
+ public:
+  TreeDrawTest();
+
+  static Draw *tagGeometry(QDomNode geometryNode, Draw *newdraw);
+
+  virtual void draw(Point3D *viewer, bool viewculling, QGLWidget *widget, Point3D direction, int phase);
+};
+
+#endif
diff -uNr c2/clientQT/earth3d.pro c3/clientQT/earth3d.pro
--- c2/clientQT/earth3d.pro	2005-09-09 18:25:20.000000000 +0200
+++ c3/clientQT/earth3d.pro	2005-10-24 21:02:36.321065932 +0200
@@ -67,7 +67,7 @@
 # QMAKE_CXXFLAGS_DEBUG += -D EARTH3DDEBUG
 CONFIG	+= qt thread opengl warn_on release stl

-# LIBS	+= -lglut
+LIBS	+= -lglut
 # DEFINES	+= STATISTIC_NODECOUNT
@@ -122,6 +122,7 @@
 	tree/textureTreeNodeCore.cpp \
 	draw/draw.cpp \
 	draw/treeDraw.cpp \
+	draw/treeDrawTest.cpp \
 	draw/treeDrawSphere.cpp \
 	draw/treeDrawPOI.cpp \
 	draw/treeDrawPOISign.cpp \
(Download it here: treeDrawTest.patch download).
In case you do not know how to read a patch file, here is a short explanation:
In this patch file several files were compared, each section starting with "diff -uNr...". Lines that start with "+" have to be added, lines with "-" removed. The other lines are to find the location in the file where to add or remove the "+" and "-" lines. To apply the patch to the project, change into the "clientQT" directory and call "patch -p1 < treeDrawTest.patch".
Now back to the example: We will create a new visual with the geometry type "test" (this will be explained later). We will add two files, treeDrawTest.cpp and treeDrawTest.h.
Lets go through the patch file step by step:
- In the file draw/treeDrawFactory the new header file "treeDrawTest.h" is included and three lines are added to the XML parser. They look for a geometry tag with the type "test" and then call our new class.
- The file treeDrawTest.cpp is added. It is a minimal example that only consists of three functions:
- An empty constructor.
- A draw method. It gets the current viewpoint (viewer), if
viewculling should be used, the QT OpenGL widget (widget), the
direction in that the camera looks (direction) and the drawing
phase. Normal objects should use phase 2 to draw themselves,
otherwise they could confuse mouse navigation, which needs the
correct Z values for earth's surface.
This draw method moves the coordinate system to (-1,0,0) and draws a sphere with radius 0.1 and 10x10 slices using GLUT in the current color. The earth's radius is 1 so it will be on the surface at 0N 0E. - The tagGeometry method called in treeDrawFactory to parse the "test" geometry node of the XML document. In our case we will not parse it, but return always a new object of our class.
- The file treeDrawTest.h is added. It inherits our new class from Draw and adds the three methods we already know from treeDrawTest.cpp.
- The library "glut" and the file treeDrawTest.cpp are added to QT's project file.
That are all necessary code changes. To use it, you need two XML files you can load. I will explain them later. The interesting part is in geometry.mxml:
<geometry type="test" name="Test object">
</geometry>
This defines a geometry that will create our visual of type "test".
After applying these changes compile the executable with
qmake earth3d.pro
make
Now download the files service.sxml and geometry.mxml in a ZIP file (geom.zip) and extract them into one directory. Load the service.sxml using the "Add service" icon at the top left of the window. In the tree view on the left our "Test object" should appear. Load it by double clicking it. If you have also loaded a view of the earth you should get a view similar to this:
Using the server software
The server software can be used to integrate own maps. It is currently available as source via CVS. A windows binary was released on request on 29.11.2005 and is available from here: earth3d_server_windows_1.zip. Please also read the corresponding paragraph in the FAQ on www.earth3d.org.
The server is not intended to be used by normal users since it is only command line based. It needs the libtif, libxml2, libpng12 and QT to compile. The source code for the windows version (or the patches to allow the normal version to compile under windows). are not yet available.
Example how to use the server software: You start with an empty map. The lines to add the initial Blue Marble (NASA) data look like this:
rm -r data
mkdir data
./insertSatellite ./land_shallow_topo_west.tif 0 0 0.5 1
./insertSatellite ./land_shallow_topo_east.tif 0.5 0 0.5 1
First the data directory is removed and recreated to start with an empty map. Then insertSatellite is called to insert the western and eastern hemisphere. The map has coordinates from 0 to 1. When you look at the parameters you see four numbers. They are x, y, width, height. So there are two maps both fill half the global map in x (0.5) and the full map in y (1). One starts at the coordinates (0,0), the other at (0.5, 0).
Afterwards smaller maps with higher resolutions may be added:
./insertSatellite "Italy.A2003262.1005.250m.tif" 0.515801666666667 0.209762777777778 0.0406277777777777 0.074943888888
It is simple to convert from GPS coordinates to coordinates in the (0..1, 0..1) coordinate system. (x,0) is the north pole, (x,1) is the south pole.
Heightfields are generated in a similar way:
rm -r heightdata
mkdir heightdata
./insertHeightfield FILE.DEM FILE.HDR
Both programs generate many numbered files in the directory data or heightdata. To use them with a webserver the following command is used:
./urlMapServerCreator <base URL> <destination path> <texturepath> <heightfieldpath> <icon file name>
Example:
./urlMapServerCreator http://www.earth3d.org/earth/ www/ data/ heightdata/ icon.png
This creates the necessary files service.sxml and geometry.mxml for using with a webserver and the client. Since these programs can create several thousand files in one directory it could be a problem to move this directory to another computer or filesystem. I used XFS und Linux which can handle a large amount of files without problems. But to use it with a less good scaling filesystem the converttodirs.rb script can be used. It is a ruby script that creates the hierarchy used in the downloadable data to distribute the files to many directories. Each directories contains a maximum of 10 files and 10 directories.
These programs are difficult to use and should be used only by experienced developers. I will provide more tools and documentation later.